Articles (click to read)
| Beating the Band | The Strength to Swim Properly |
| Nutrition: The Fourth Discipline | Top athletes have coaches. Why do you need one? |
Resources
Top athletes have coaches.
Why do you need one?
What is similar between Ironman World Champions,
Tour De France winners, and Olympic gold medalists?
The simple answer is they all have a coach.
What about if you don’t necessarily have aspirations to be a
world champion or gold medalist?
What if you just want to complete your first Ironman, win your
local criterium race, or set a PR in an upcoming half marathon?
Coaches provide the input and flexibility to maximize your time.
The goal is to always do the minimum amount necessary to maximize
your adaptation and benefit to training time.
Coach vs. Online Training Plan:
A lot of people fall into the trap of downloading
that 18 week “Couch to 5k” set-in-stone training plan.
I am not saying that these training plans are horrible.
If someone has a lot of experience and knows how to properly
modify the training to fit the stresses of daily life then these plans
provide a decent footprint.
Let’s look at a trusty pro/con list to see what a training plan is all
about.
|
Pro |
Con |
|
�
Typically
budget friendly
�
Long term
planning possible (but not necessarily a
good thing)
�
Provides
footprint for an experienced athlete |
�
Inflexible to
daily life
�
Good
possibility of over or under training
�
No
feedback on training could lead to
injury |
IREP athletics does have these set-in-stone
training plans for triathlon, running, cycling, and swimming.
Partnering one of these training plans with a one or two
consultations would provide a budget friendly alternative to monthly
coaching.
Online/local Coaching:
The stigma around hiring a coach is that it is
always too expensive. But
can you put a value on your overall health and performance goals?
Hiring a coach provides the flexibility and experience to
maximize an athlete’s potential through maximizing the time available to
train. A coach will listen
to the athlete and modify the daily training plan in order to work
around those life events and stresses that you can’t control.
A coach will know when to back off and perform some serious body
maintenance when that niggle pops up.
Take a look at the following pro/con list for hiring a coach:
|
Pro |
Con |
|
�
Best bang
for the dollar
�
Personalized training programmed with
high frequency
�
Adaptable
to daily life events and stresses
�
Adaptable
to injuries and niggles
�
Form/gait
coaching
�
Maximize
training daily training time |
�
Can be expensive
(discounts are available and all IREP
coaches are willing to discuss budget
limitations) |
All of the coaches at IREP Athletics believe
in implementing the most up to date training theories to set our
athletes up for success. We
believe in connecting with our clients and building a relationship where
sharing information is not looked down upon.
I recommend connecting with one of our coaches to find out some
more information about what we can provide.
This initial communication is completely free so there is really
no reason not to talk.
Don't put off until tomorrow what you can do today.
Nutrition: The Fourth Discipline
Imagine if you were in a big city traveling with a
large group of people. You
got to the subway station and realized only a small amount of you would
fit on the subway car. You
are left with two options: wait for the next subway car and continue to
move your group over a longer period of time or use the bus that runs at
street level and move some of your group to your destination at the same
time on the bus. Even though
the bus takes longer the synergistic effect of being able to trickle
some of your group members to your destination via two transport systems
is most efficient.
Race day nutrition functions in a similar manner.
An average size male athlete has absorptions rates between
30-90grams/hr during exercise.
The upper end of this scale 90g can only be achieved with
utilizing multiple delivery methods our bodies can utilize.
We transport glucose and fructose via different transport
systems. Knowing what is in
your nutritional product is key and what you tolerate well is vital to
your performance.
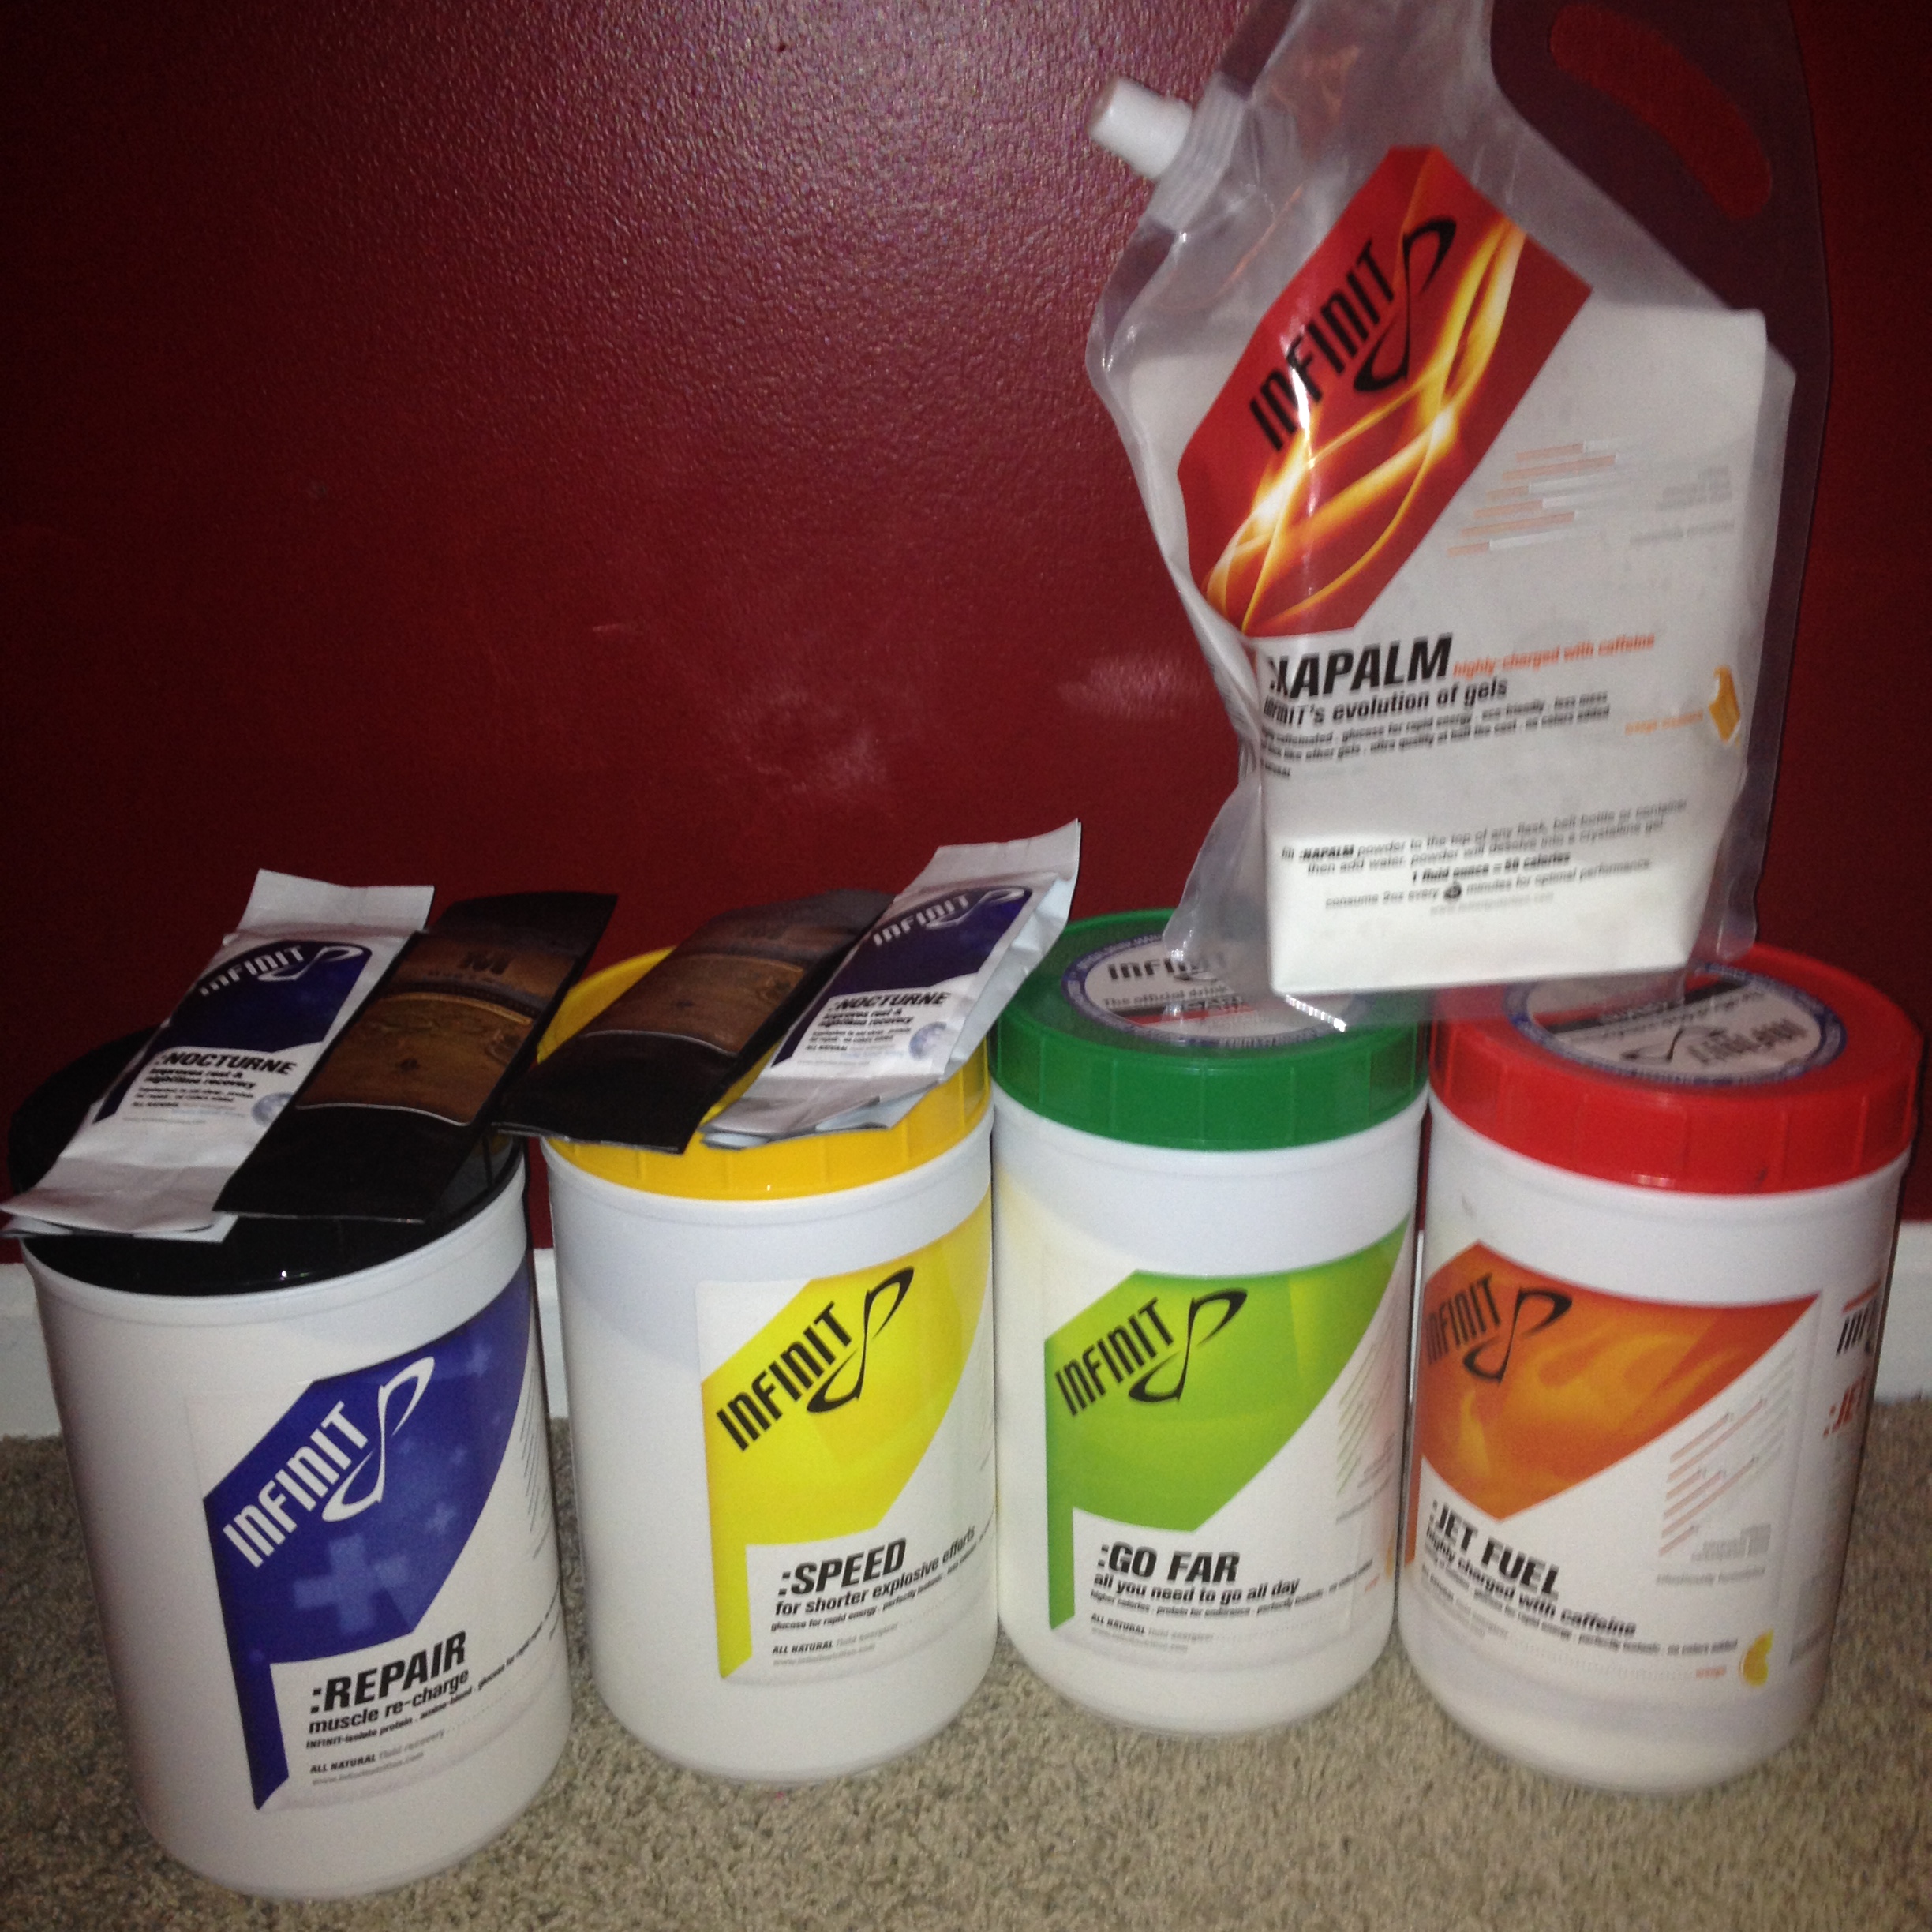
There are many triathlon fuel options available and
an entire industry devoted to it.
Glucose, fructose and maltodextrin are the primary ingredients
that contain the calories of these fuel sources.
The delivery methods come in powders that are mixed into liquids
solutions, gel packets, bars, chewy candies etc…
The delivery method to use is very individual.
As intensity increases blood is shunted from the core of the body
and shifted out to the working skeletal muscles.
This slows the digestion process down significantly and may wreak
havoc on a normally iron stomached person.
With under-fueling the dreaded “bonk” or “hitting
the wall” technically called hypoglycemia may show up stopping an
athlete in their tracks whereas on the polar opposite end of the
spectrum over fueling in a short duration may lock up the stomach and
shutdown all forward progress and leave you lying on the side of the
course in the fetal position contemplating jumping in front of traffic
to end the misery.
As the distance of your triathlon increases
nutrition inevitably becomes more and more important.
As any motor vehicle is limited by it’s efficiency and size of
it’s gas tank the human body functions in a similar manner.
We can store around 1hr-1.5 hrs worth of calories on board in the
form of glycogen which we store in our skeletal muscles and liver.
In half Ironman and Ironman distance events
developing and practicing a nutritional strategy is vital and should be
implemented in to the specificity of the workouts during the build- up.
The old clich� “Nothing new on Race day” is very fitting in
regards to nutritional strategies, therefore rehearsal and fine tuning
is imperative.
Individuals usually tolerate liquids fairly well. If you can find out what you’re “A” race will have available on course it is a good idea to start utilizing that on your longer workouts, or have a strategy and set up that allows you to carry all you will need on board your bike of a liquid of you’re choice. A host of bike hydration options are available, often a simple behind the seat and between the aerobars set up is a good safe option. Practice with that bottle location to assure you can that it can be safely and effectively reached during the ride. On the run there are options to carry your own liquids as well through the use of fuel belts. Maltodextrin products such as CarboPro are tasteless and easily dissolvable in most liquids. There are also flavored options available such as INFINIT (IREPINFINIT for 10% off at check off) Practice adding these at different amounts to deliver more calories during exercise to replace the calories burned and increase performance.
Gels would be our next easiest product to process
during an event. Some gels
are mixed with sources of fuel that come from fructose and glucose.
Also pay attention to your electrolyte needs, a “salty” sweater
may benefit from a gel that contains more sodium in hot/humid
conditions. You may also get
some benefit from gels that contain caffeine as it is a proven
performance enhancer.
As food sources start to get more solid the
processing time increases as some more complex digestion is required.
Some may choose to experiment with more semi solid/solid food
sources. While some do very well with these types of fuel, be cognizant
of how easily these are eaten at race pace.
The unwrapping and chewing process can be more difficult than one
may think and leave people unsteady on a bike or choking on the run.
A quick and easy starting point is to assign 2
calories per hour per pound of lean body weight.
Example:
200lb @ 20% Bodyfat
200lbs x .20 = 40 lbs of fat
200lbs – 40lbs = 160 lbs of lean body mass
160lbs
x 2 cals per lb per hour = 320 calories/hour
In summary, KISS (Keep, It, Simple, Stupid).
The less moving parts the better and the simpler your nutrition
strategy the more likely you are to execute it perfectly.
Sometimes Less is More and Nothing New on Race Day!!
Best in Health,
Scott Proscia, BS ATC M.Ed
Head Performance coach IREP Athletics
The Strength to Swim Properly
The early vertical forearm in swimming is an elusive skill for most
adult onset swimmers. It is the ability to latch on to the water soon
after the hand enters the water and pull the body past an anchored hand
in an efficient manner. The swimmer does this by internally rotating the
shoulder allowing the hand and forearm to drop below the elbow before
initiating the pull while the arm stays abducted out to the side. The
swimmer should feel some resistance from the water medium in the palmar
aspect of the hand and on the forearm. This feeling can be illustrated
by imagining a driver in a car rolling down their window and placing
their hand on the side view mirror. If they were to externally rotate
their shoulder and lift their hand straight up (as if they were
signaling a Right turn on a bicycle) they would feel a similar
resistance on their hand and forearm.
A common problem for some swimmers is dropping the elbow below the
forearm and hand and pulling with a straight arm. People simply do not
have the strength to hold elbow in a high position close to the surface
as the forearm and hand drops down during the catch and pull.
We can address the strength deficit with the exercises below:
Prone Scaption Series
All of the following exercises can be done on a Treatment table, flat
weight bench, incline weight bench or on a stability ball:
“I”/ “i’s” – the arms remain close to the trunk and are raised with the
palms facing each other. The shoulder can flex and the arms extend past
the head or the shoulders can flex bring the hands near the hips
“T” the arms are abducted with a straight arm.
Weight may be added to the hand. This exercise can be done with thumb up
and thumb down
“W” the arms are abducted out to the side with a
flexed elbow creating “W’ shape. The palms should face the ground
“Y” the arms are extended out in front of the head. This exercise can be done with the thumb up and thumb down.
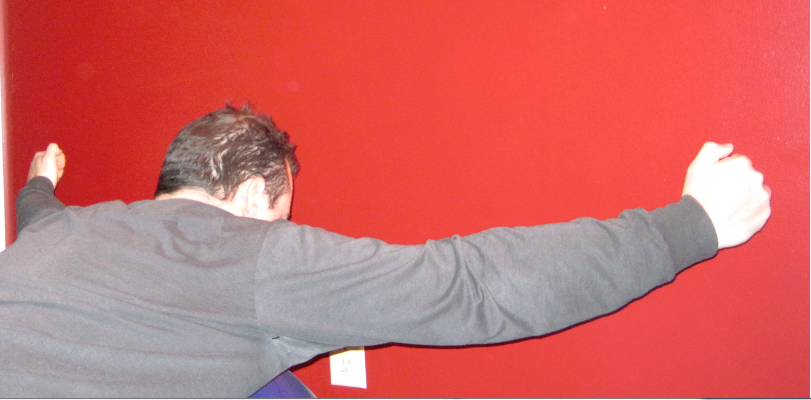
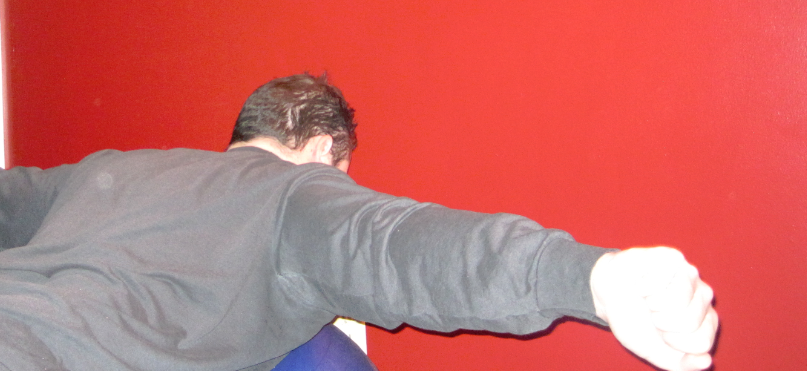
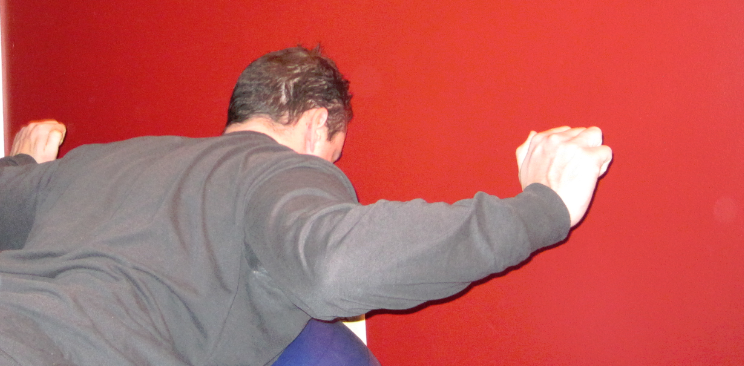
Weight/Band Bent Over 90 degree Shoulder Abduction
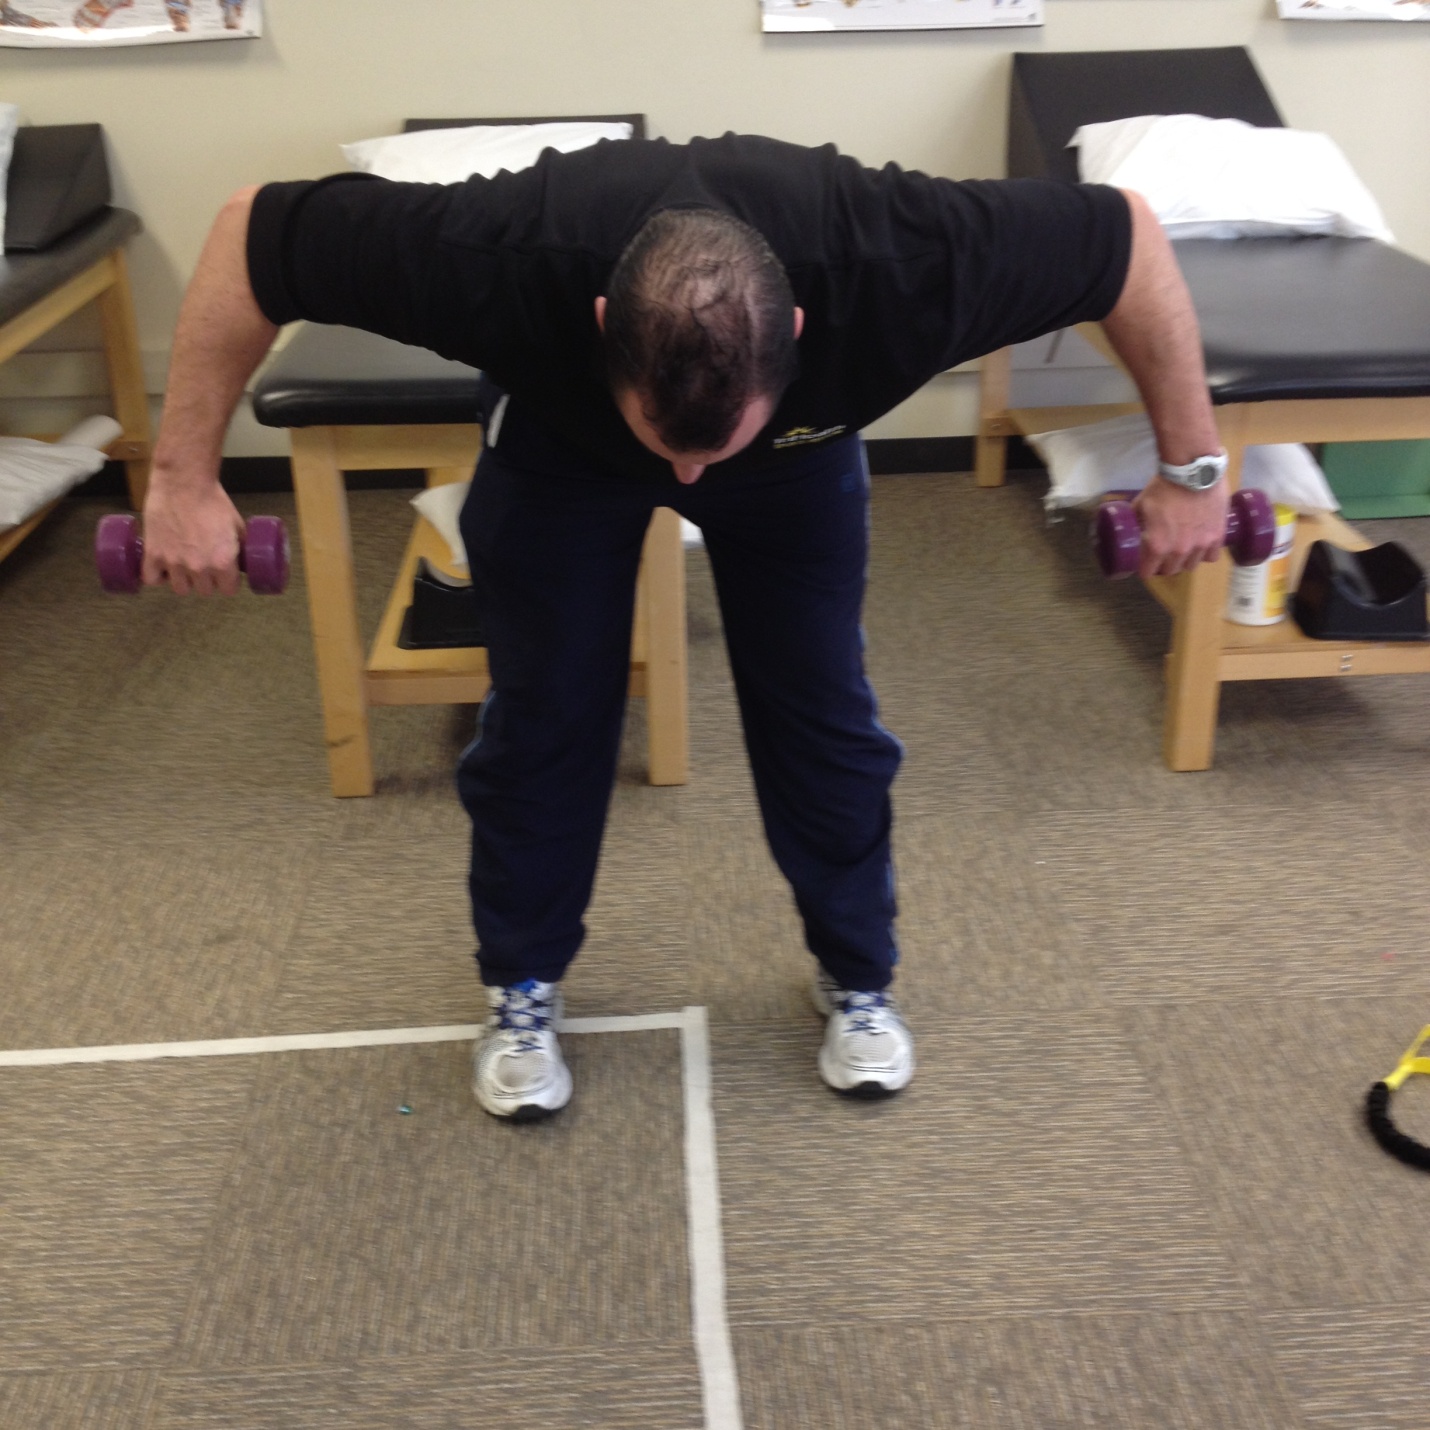
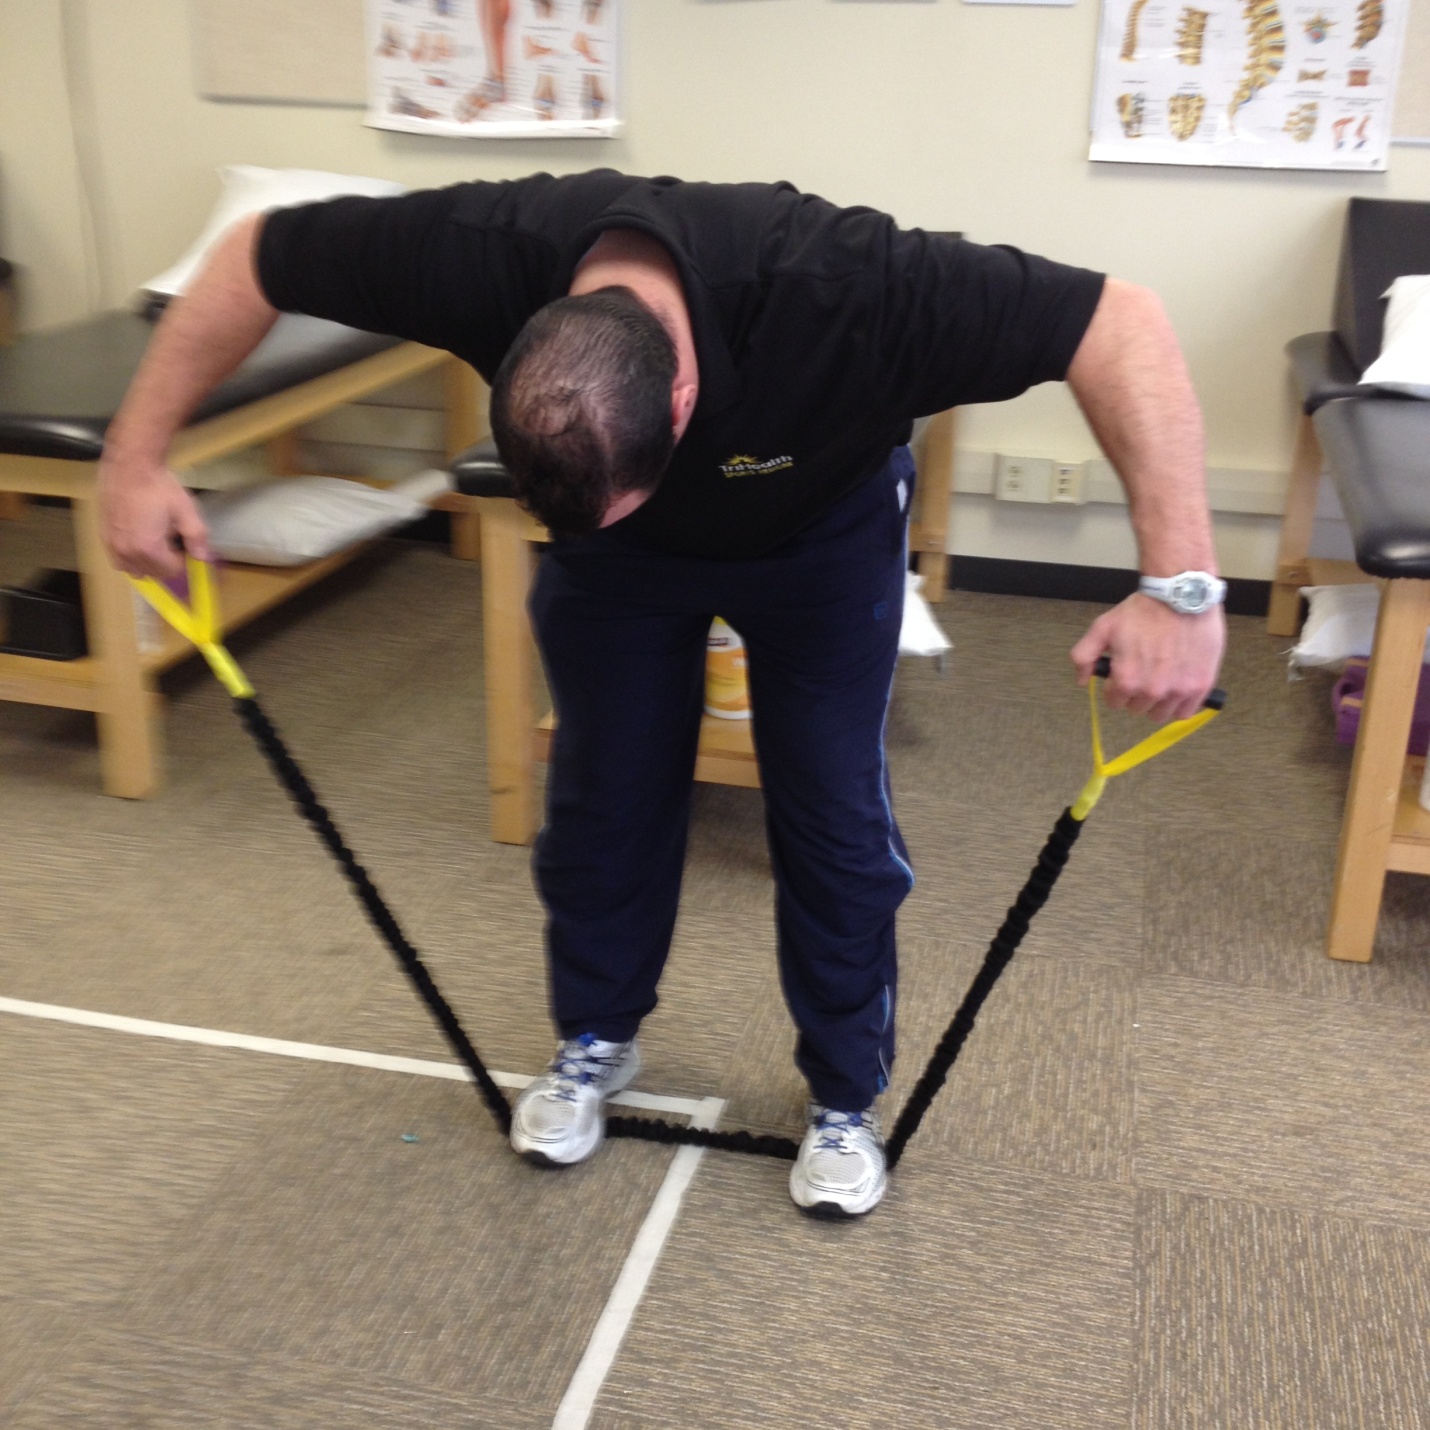
Weights or bands are placed in the hands with shoulder and elbow both abducted to 90 degrees the weight is lifted straight up linearly. The hands should remain on plan and not deviate towards or away from the body.
Standing Shoulder Flexion with External Rotation Isometric using band
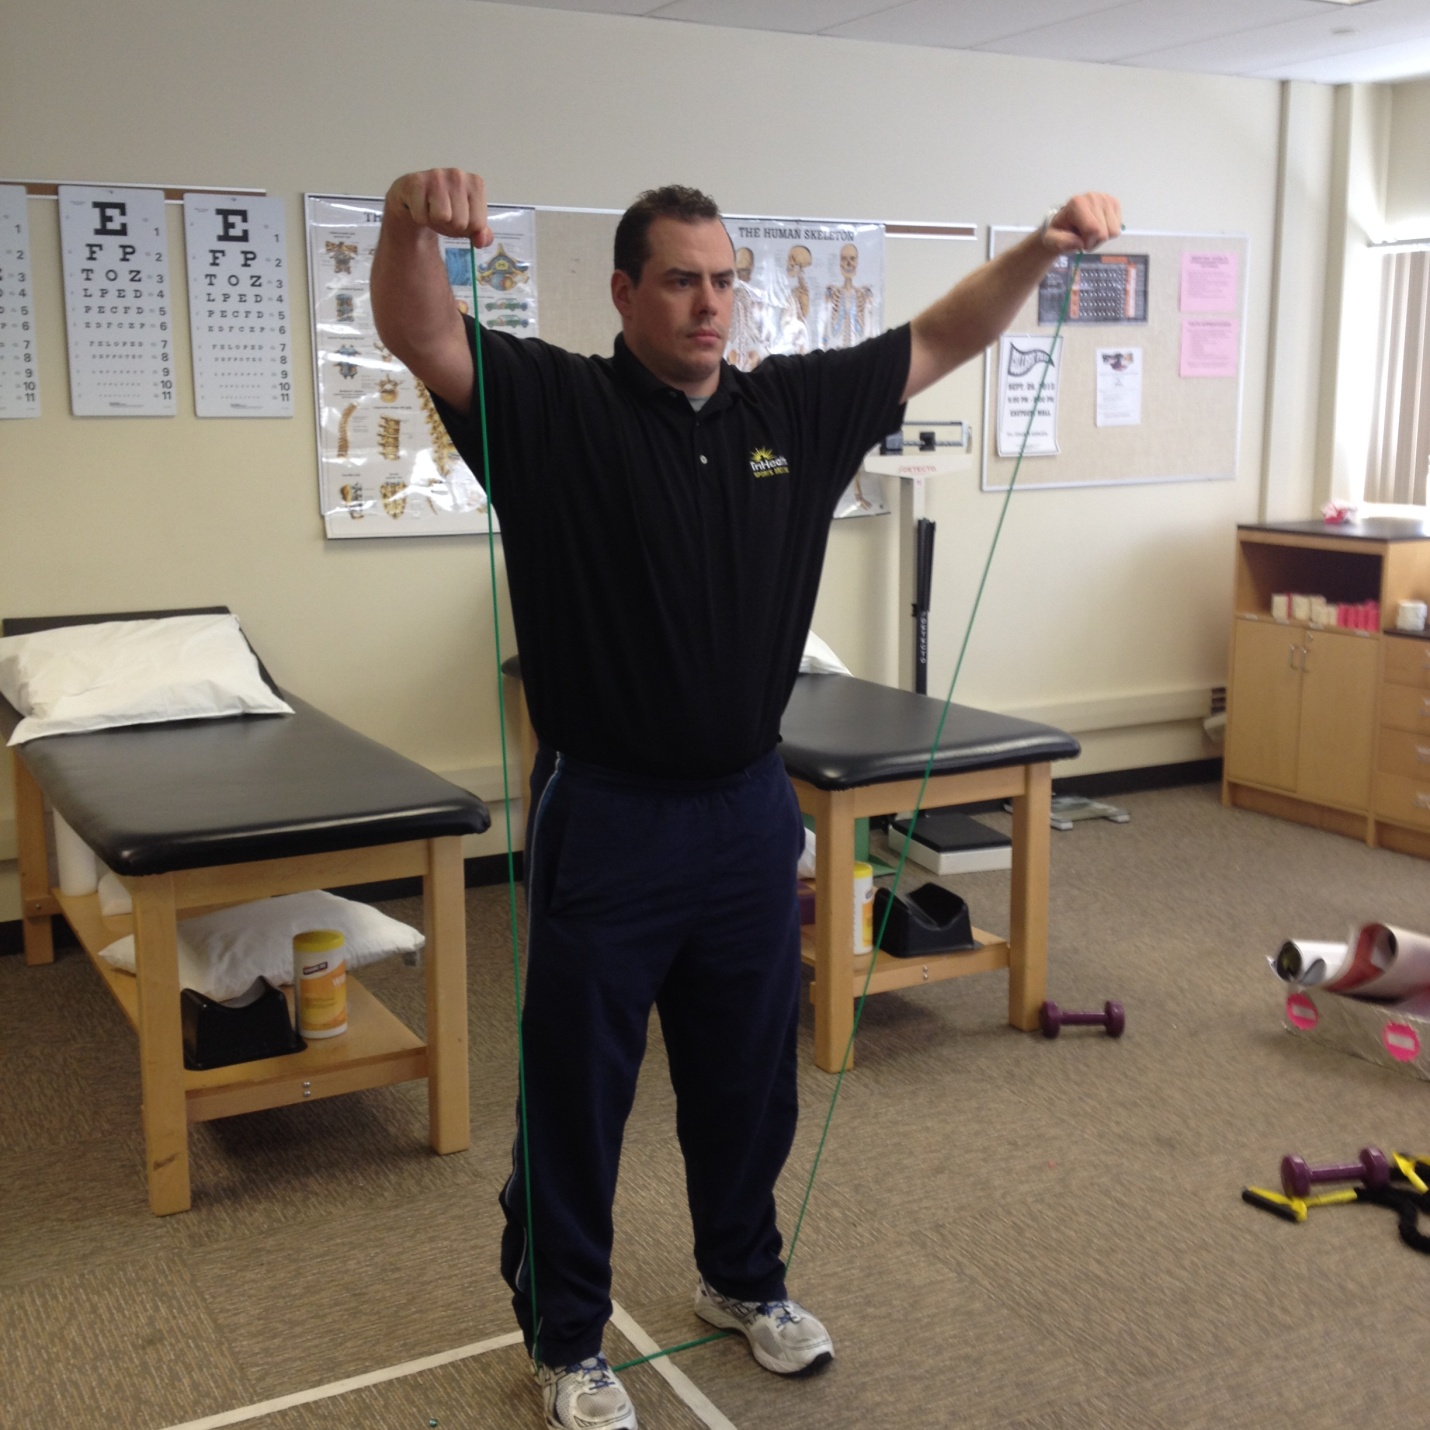
Shoulders are flexed overhead and arms are slightly internally rotated
as if initiating the catch phase of the freestyle stroke. This isometric
contraction should be held static for time.
Prone resisted abduction and
external rotation isometric
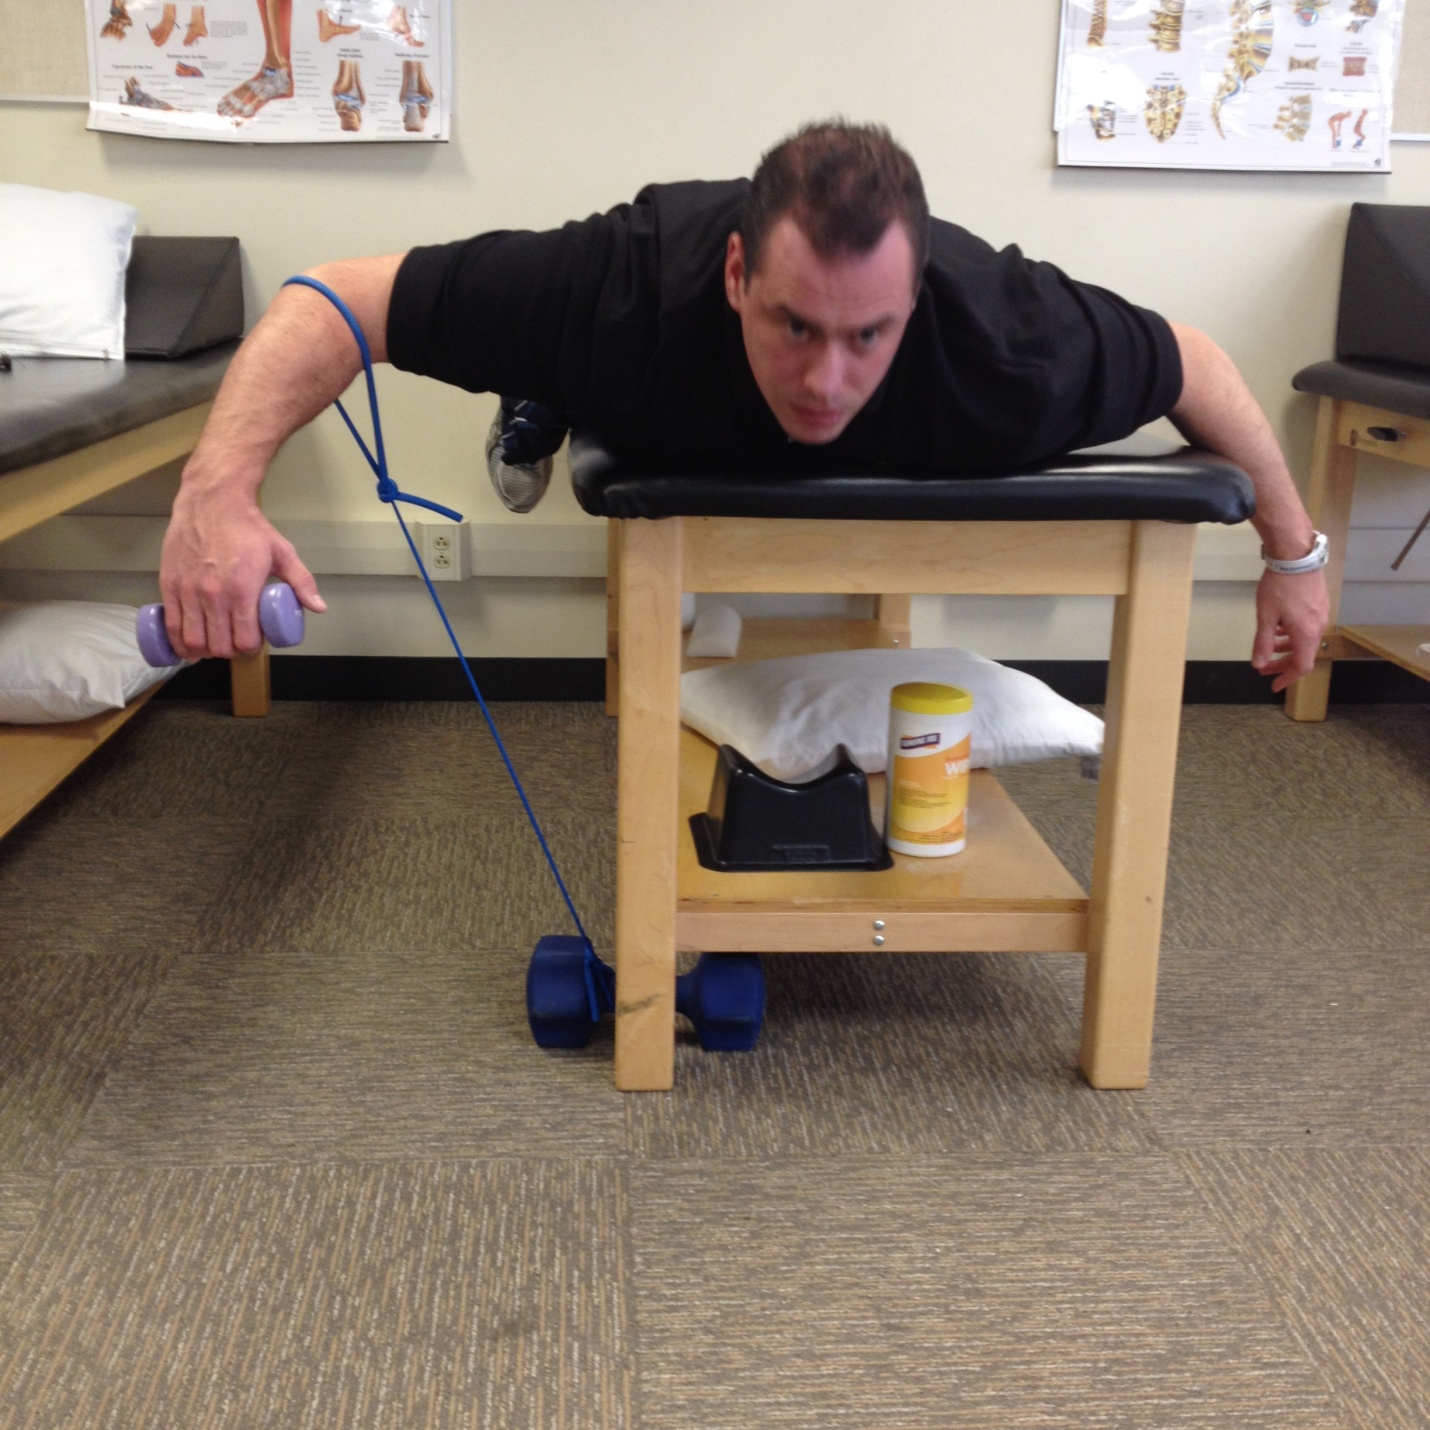
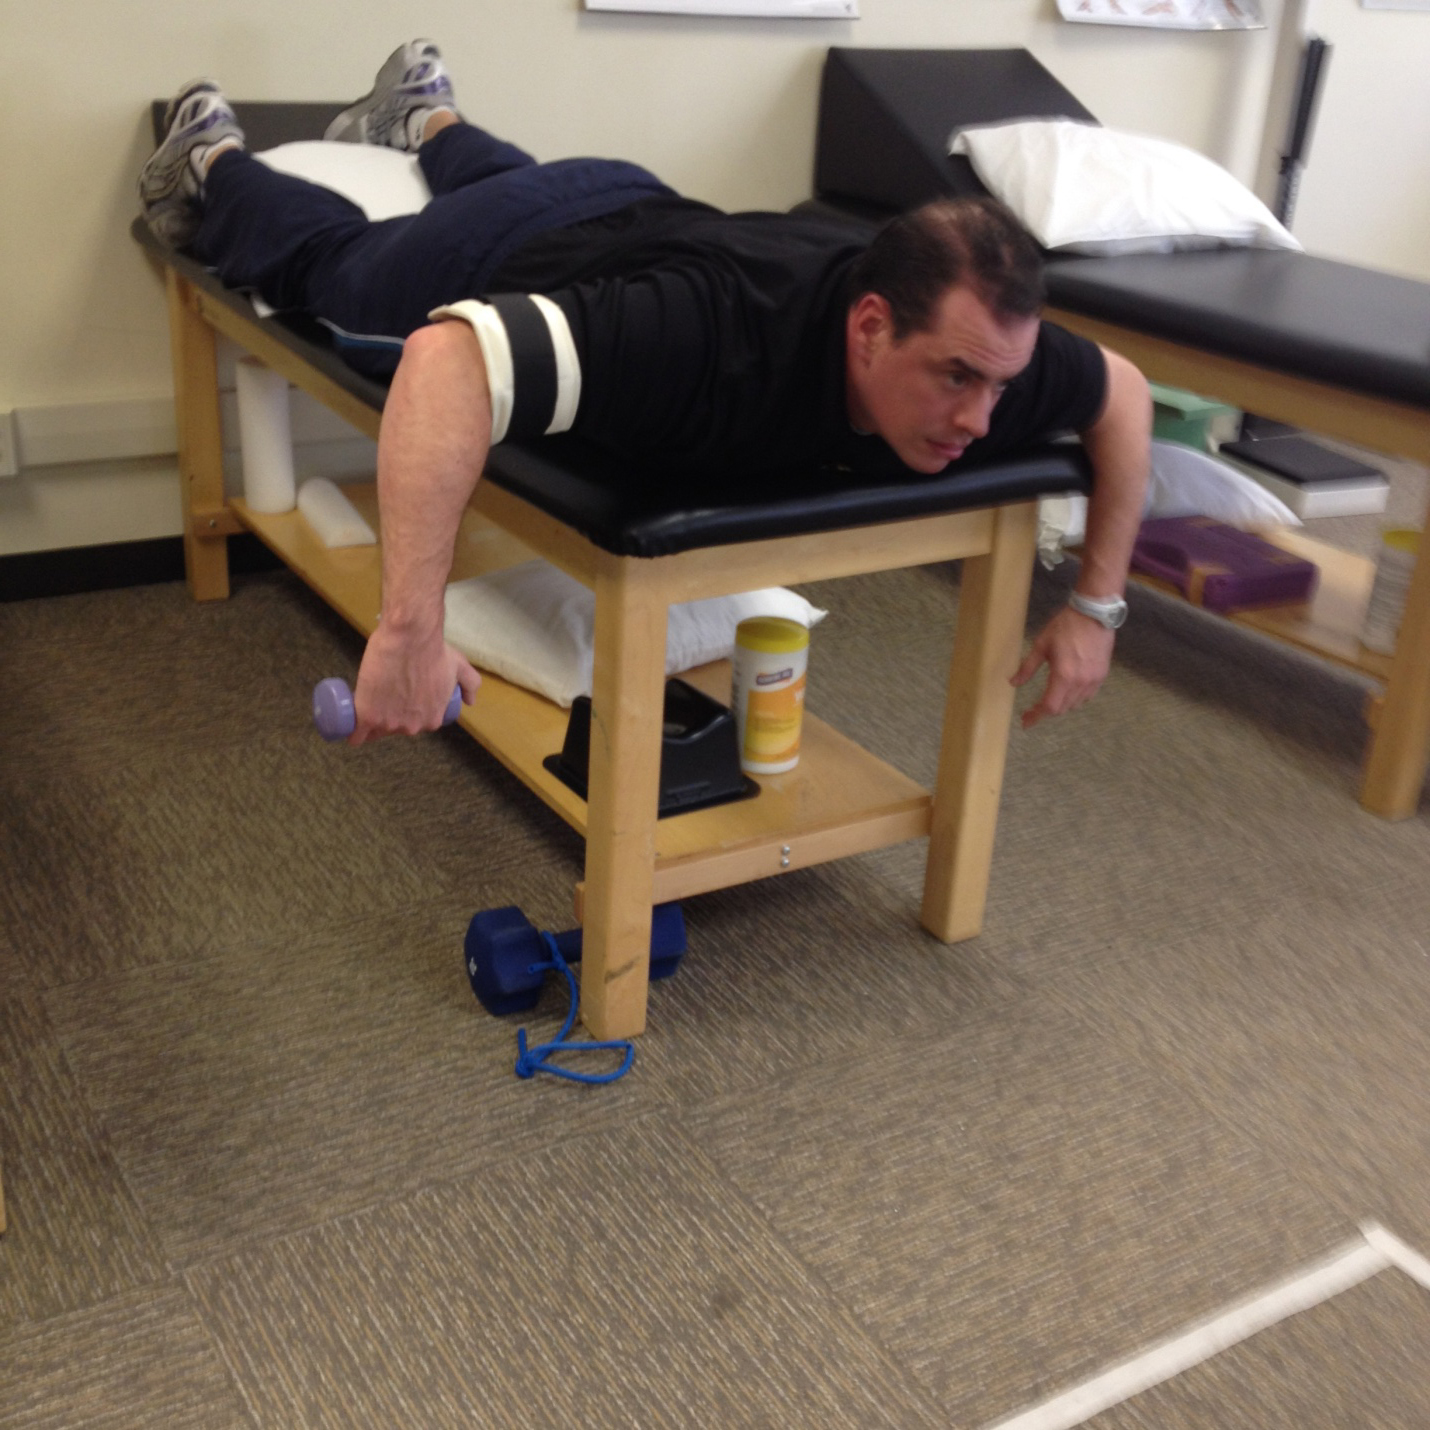
Resistance for abduction can be
placed around the elbow joint using a band or weight cuff.
The use of a distal weight in the hand stressing the isometric
external rotation can be utilized to emphasize keeping the shoulder high
when initiating the catch phase of the swim stroke
I have been either studying or working in Sports
Medicine since I entered Undergrad in 2001.
I had no major injuries even though I was an athlete from the age
of 3 through college. I
always thought that my patients with overuse injuries had a bit of a
soft side to them and were looking for an easy out as all of my injuries
I was able to play through or missed very little time of practice or
competition. From 2005-2010
I was very sporadic in my exercise regimen.
I neglected my body and when I started off in endurance sports I
met my first overuse injury.
I was running some stairs (never again by the way) and it felt like
someone stuck a hot knife in the side of my knee.
I ran back the 2 miles to my starting location with this grinding
and clicking that reminded me the time the transmission blew in my
Camaro and I had to limp home in 1st gear.
Thinking I was just having a bad day I went out the next day for
the next run was and BOOM! Less than a mile in and I am officially
injured. I immediately went
past ITBS and thought this must be a Lateral Meniscus Tear or I avulsed
something off because it hurt so bad.
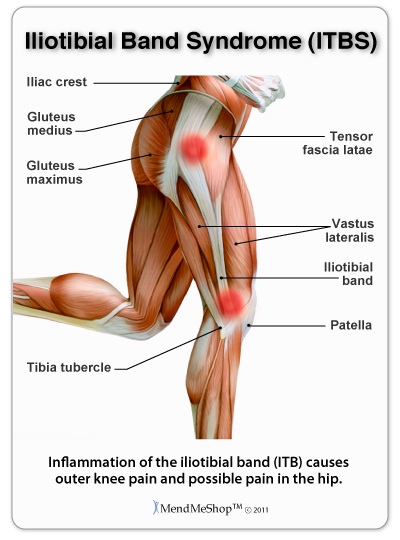
Decades of runners and cyclists have been plagued
with the infamous Iliotibial Band (ITB) pain.
Iliotibial band syndrome (ITBS) usually presents as sharp or
burning lateral knee pain.
The pain is often reproducible and rears itself early in a workout often
at a specific time or distance stopping the runner in their tracks.
This debilitating pain usually subsides rather quickly with only
lingering symptoms occurring with ascending and descending stairs.
This article will review condition and provide rehabilitation
strategies for managing ITBS.
Anatomy Review
The ITB is a thick band of fibrous connective
tissue that originates on the iliac crest sharing fascia with the
gluteal muscles and Tensor Fasciae Lata (TFL) proximally and continues
down the lateral aspect of the leg tying in with the Biceps Femoris and
Vastus lateralis where it crosses the knee joint over the lateral
epicondyle inserting on to the Tibia.
When a person runs their hip and thigh muscles help
to stabilize the thigh and pelvis.
The range of motion of moving your lower extremity at the hip
away from the midline of the body is called abduction.
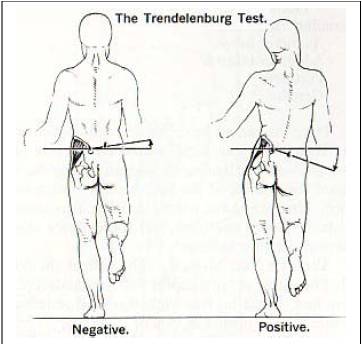
During the running gait at the initiation of the swing phase of
one limb the opposing leg is in full contact with the ground at mid
stance and the pelvis should remain stabilized by the active muscles of
the TFL and Gluteus Medius to prevent “crashing” or a Trendelenburg’s
gait pattern by abducting the hip.
ITBS
The ITB is a thick tendinous extension of the TFL.
Tensile strength of the ITB has been reported at 7800 psi or the
same as soft metal. The ITB
shares some attachment with the lateral patella as it crosses the knee
joint before inserting onto the lateral tibia.
As the knee flexes around 30 degrees an area of friction or
compression occurs at the lateral knee.
Irritation occurs at this location (impingement zone) causing
inflammation of the underlying tissues of the posterior side of the ITB,
Bursa and fatty tissue.
Chronic ITBS suffers may even develop thickening of the ITB in this area
further exacerbating the condition.
Some studies have even shown bony erosion occurring at the
lateral epicondyle in the most severe cases.
So why do some athletes get this injury and others
do not?
Am I just tight?
The Ober test is a standard clinical laxity stress to to evaluate
tightness of the ITB. (insert picture)
Tightness of the ITB will present with the leg not falling into
adduction past neutral. A
fair assumption is that if we are qualifying compression or friction as
a mechanism of injury that a tighter structure would cause more of this
to occur further increasing the problem.
What causes this tightness?
It was mentioned in the anatomy section that the ITB is a
biarticular structure that shares fascia connections throughout the hip
and thigh which makes this a complex question.
The common belief is that the ITB is tight when rather it is a
holistic problem affecting several muscles of the hip and thigh.
A trigger point is an area of restricted tissue.
All trigger points are not created equal and restoring these
tissues often requires movement patterns and manipulations that differ
from traditional techniques.
Kelley Starrett, DPT of the Mobility WOD and author Supple Leopard is an
expert that has developed various movement techniques which do a
tremendous job of addressing these tissue conditions.
With ITBS we often see restrictions proximally in the entire hip
region, restrictions can be found in the flexor component of the TFL
(which also is in charge of abduction), the Gluteal muscles and the hip
rotators. So what is not
affected? Not much!
We are plagued as a society that most of us sit entirely too
long. We develop
contractures, tightness and a laminating effect of our tissues through
lack of movement and spending most of our time in a far from ideal
position. As we move
distally we see restrictions in muscles that connect directly to the ITB
which include the Vastus Lateralis and the Biceps Femoris.
Getting “slack” and allowing these muscles to slide on each other
normally again is the mission and one that often requires habitual
attention. There have been
some contradictory research that shows a correlation between excessively
mobile ITB and ITBS but far more has been published on the other end of
the spectrum.
Am I just weak?
I mentioned tightness first because I feel that
there is a connection between tightness and weakness and it is often
similar to the chicken and the egg question; which came first?
I think the answer to this varies but they may be interconnected
or one may have caused or exacerbated the other.
We can see a phenomenon called reciprocal inhibition occur in the
muscles that affect ITBS suffers.
Our muscles work in opposing pairs called agonist (primary mover)
and antagonist (the muscle that goes on stretch or opposes this muscle)
the simplest example is the Biceps and Triceps of the upper arm.
When the Biceps muscle is contracted the Triceps muscle goes on
stretch. Now imagine if we
transplanted someone’s triceps muscle with a wooden dowel that was 2
inches shorter than the maximum length the muscle normally stretches
too. We would see a major
restriction in the amount of elbow flexion that would occur creating a
deficit.
Now weakness
may be the chief cause of the tightness which starts this cascade of
events. Using our same
example of the biceps and triceps, if the person developed a major
biceps tear which caused significant weakness in the range of elbow
flexion. The lack of
exposure the triceps will receive in a stretching capacity will
increase. The response from
lack of stress being applied to them is that they like to stay in that
position more. The sliding
surfaces get sticky and matted down and the muscles adapt to the new
stress level that is placed upon them.
SAID specific adaptations to imposed demands.
We classically see hip abductor weakness in ITBS
patients. The Gluteus Medius
is in charge of abduction in midstance and is in charge of preventing
the pelvis crashing down on the opposing side which creates a huge
amount of biomechanical compromise creating large amounts of tension in
the ITB system when the foot is in contact with the ground in the
running gait. We will
address strategies and exercises that target this musculature in later
sections.
So the answer to what cause ITBS is complex and
often has many contributing factors that we will need to manage over
time to resolve symptoms.
A regiment of mobilization, stretching and
strengthening is a recipe for success.
Let’s start by exploring stretching.
There is something to be said about getting tissues in a good
position prior to performing strengthening.
Let’s dive into mobility first
Distal Quad mobility with lax ball
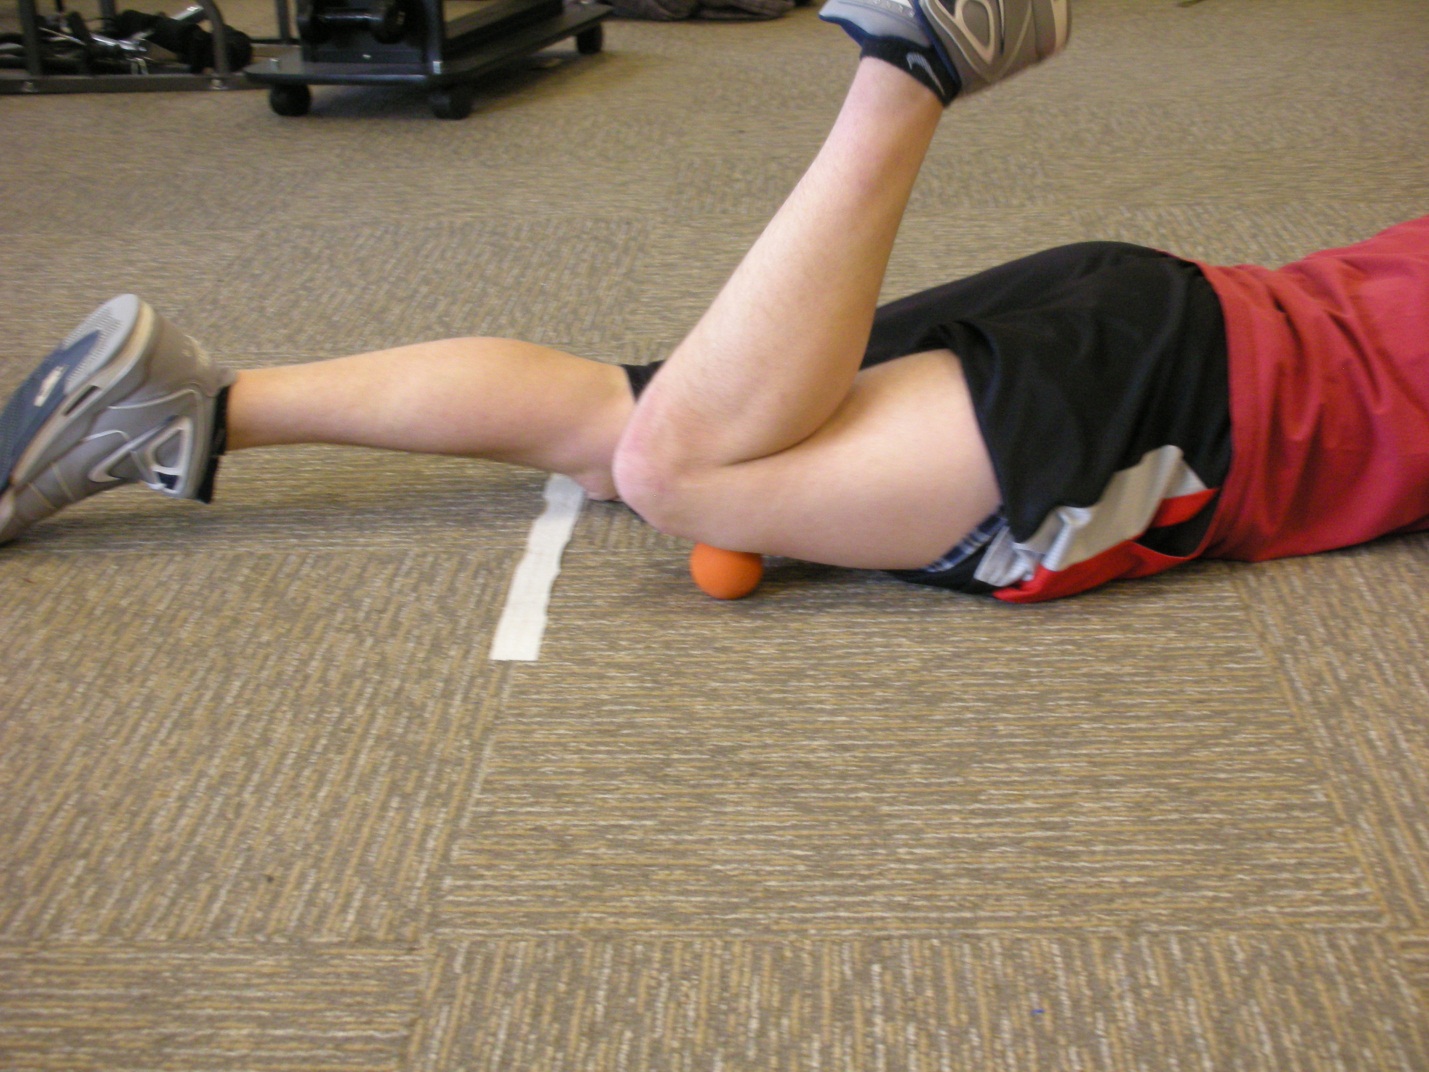
In a prone position place Lax ball just above the
patella (knee cap) shift weight to side of lax ball pinning down
tissues, flex and extend
knee repeatedly until any
crepitation or tightness resolves or up to 3 mins.
Note you may find an area of “Gristle” on the lateral border of
the patella with connections to the ITB, do not be afraid to spend some
time here and clear that area.
You can also move this lax ball against the entire length of the
ITB peeling the vastus lateralis off of it ungluing the tissues and
gaining extensibilitiy.
Foam Roller
In a prone position start foam rolling quadriceps
rotating to a sidelying position and mobilizing vastus lateralis , pay
additional time mobilizing tissue connection points of vastus lateralis
( outside part of thighs) to the ITB.
If you find a trigger point or tender spot do not roll past it
but oscillate and rotate on that area until that tissue releases.
(Yes! if you are doing this for the first time you will want to
die….no eye water please)
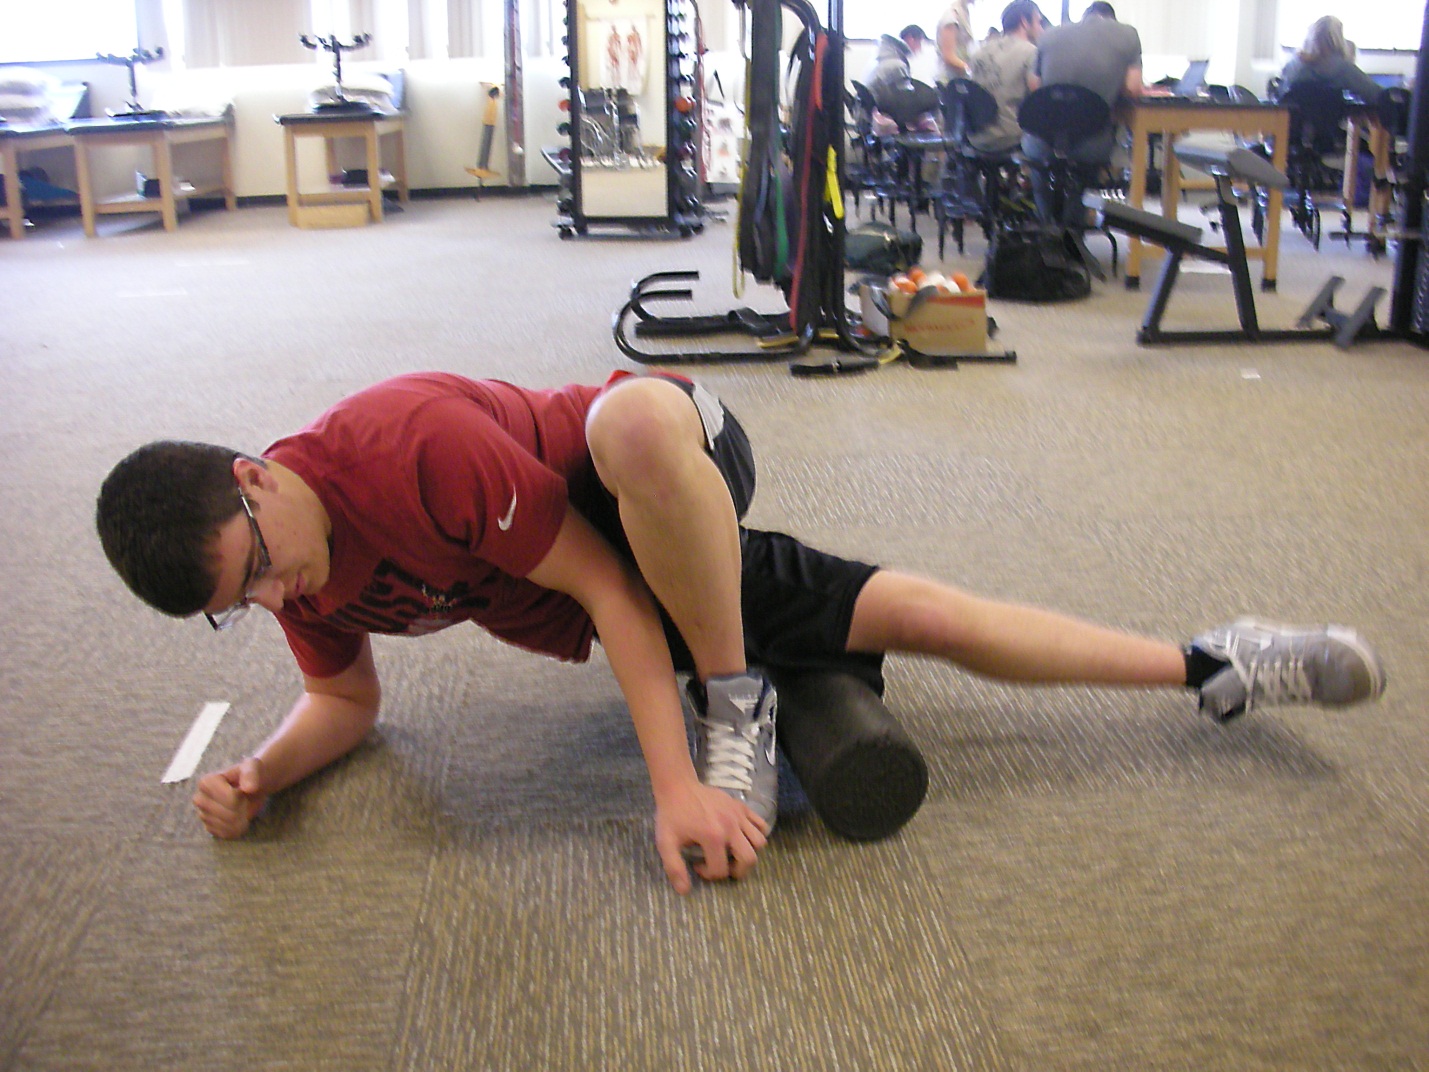
MWOD inspired Hip Opener
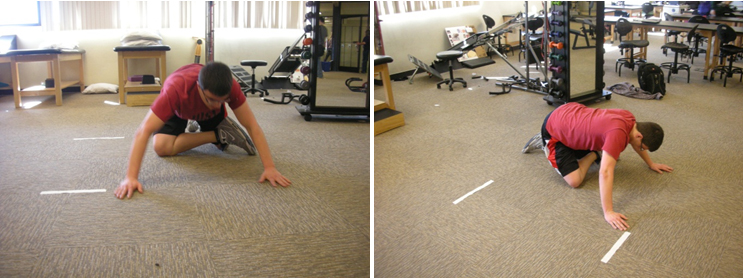
Start in quadraped (on all fours) position.
Cross affected side across the body and locking it in front of
opposite knee. Shift weight
to the side with the leg that is being crossed.
Shift hips laterally in the frontal plane (like your sticking
your hip out to that side) and scour and oscillate on that side you
should feel like the head of your femur is being stripped of its
tightness releasing as time goes on.
See Mobilitywod.com for additional variations including banded
distraction (super awesome)
Lax ball hip smash
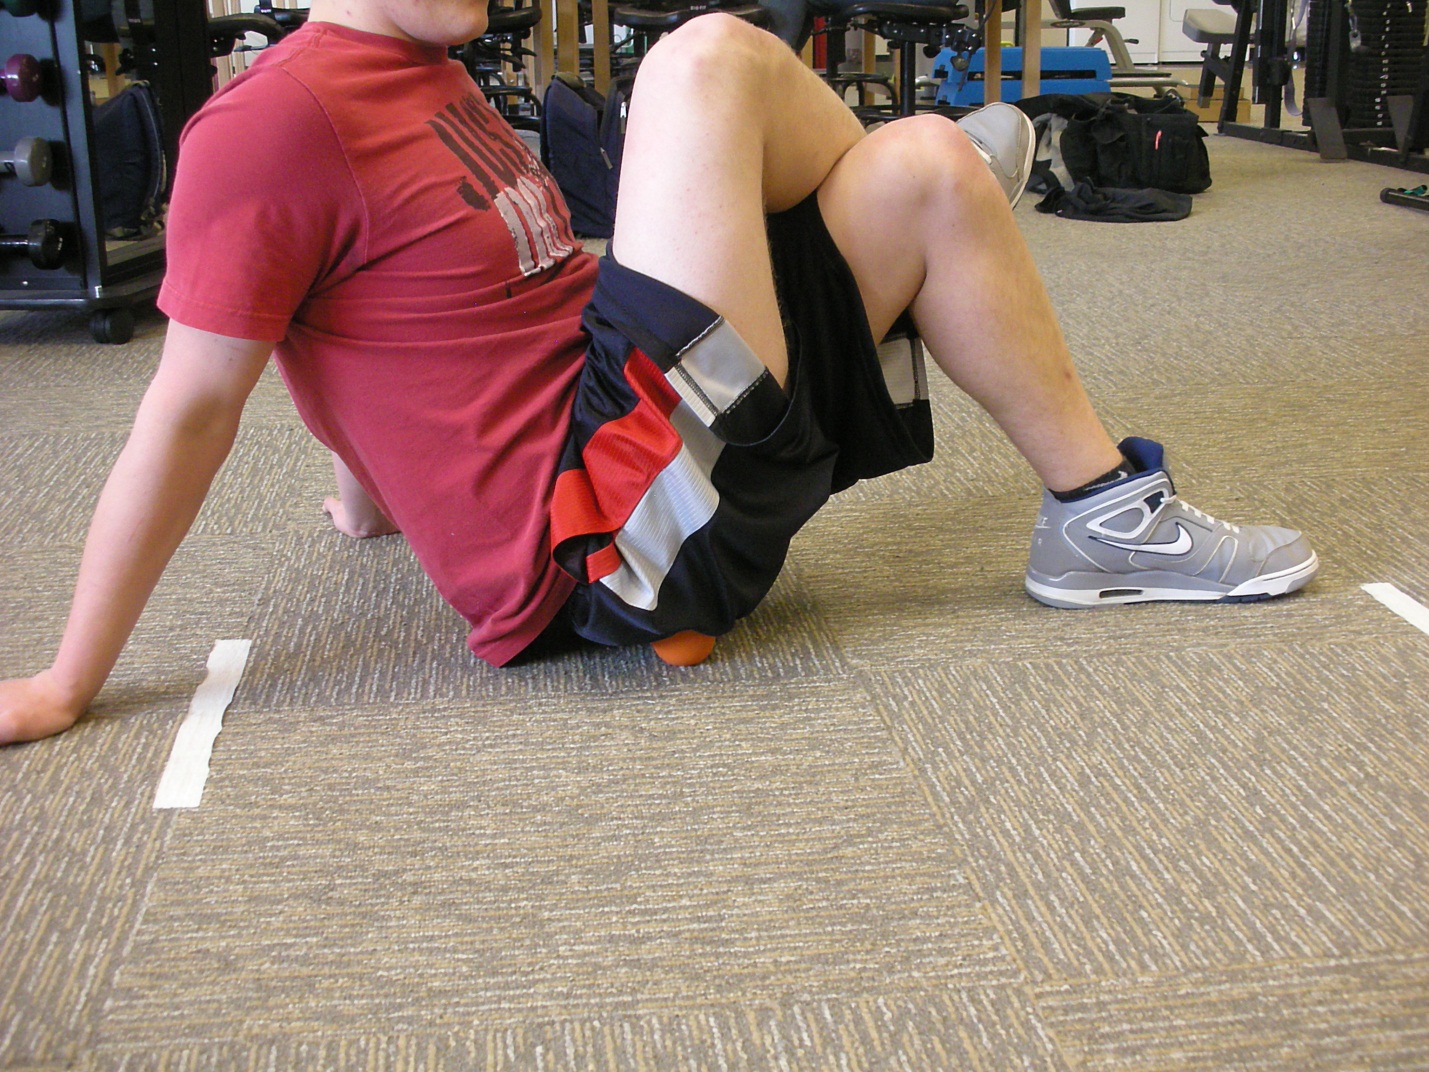
In a seated position with leg crossed sit on lax
ball on affected side.
Roll smash and oscillate on the ball around the head of the femur
stripping connection points as you roll.
Control weight with pressure on your hands as you move into
muscular structures including all of the glute musculature working all
the way up into your lower back.
If you come across a tender spot attempt to apply additional
pressure until released and oscillate through it.
You may need to swing your knee in various directions to get to
deep nastiness. If you are lucky
you will find a nice little tender area just superior to your femur on
the lateral side that sends an electric sensation down to your lateral
knee lean into it and enjoy.
Sidelying Hip Flexor Knee Extensor smash

In sidelying position get lax ball in the ara
between the top of the iliac crest (hip bone) and the head of the femur.
You will find some tendons that
need some attention. As you roll try to separate these tissues releasing
the entire area. (do you hate your lax ball yet?)
Moving to stretching
SUPER QUAD or (KStarr’s Couch Stretch)
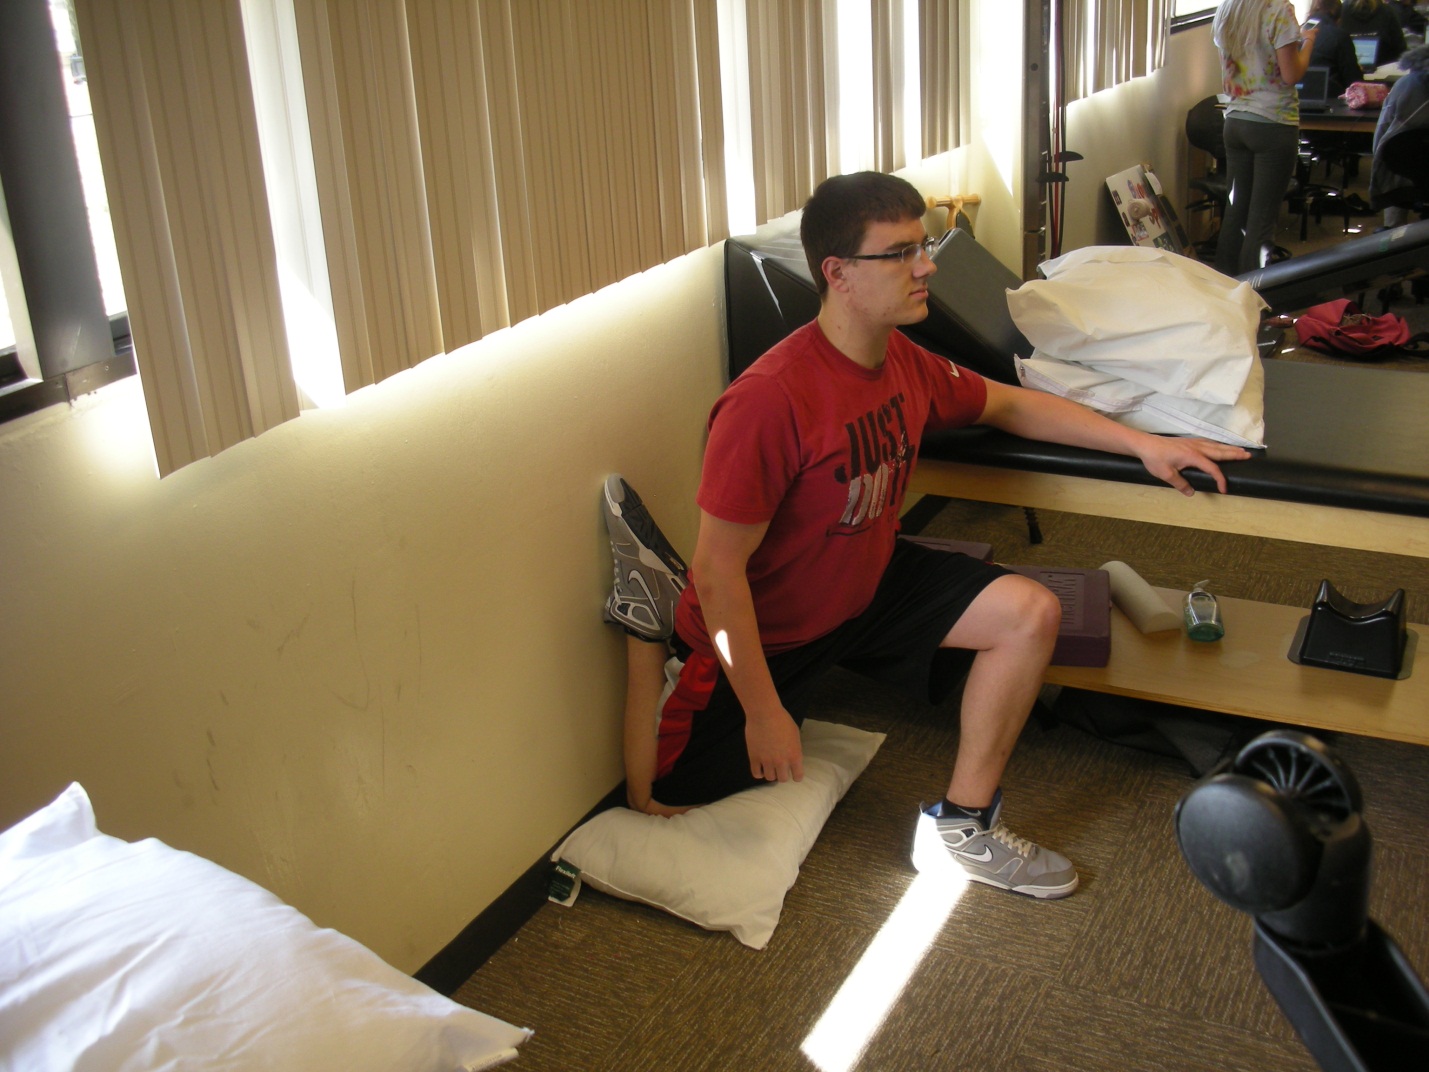
In a kneeling position place knee into corner of
wall and floor. Working from
a quadraped position move to an upright position attempting to fire
glute and press hip forward.
You may use Proprioceptive Neuromuscular facilitation (PNF ) or periods
of pressing forward followed by relaxation to gain further Range of
Motion opening the hip angle.
You may add hands overhead or rotation away from the knee that is
down for additional problem areas of tenderness and restriction
Standing Hip Flexor/ Knee Extensor hang
Place knee on back of chair, couch or table.
Drop knee toward floor hanging toward foot support.
Oscillate and maneuver knee so that you get a pulling or
stretching occurring at the lateral knee cap.
Goal here is to open hip, stretch anterior thigh and distal
fascia at knee.
Cross Over ITB
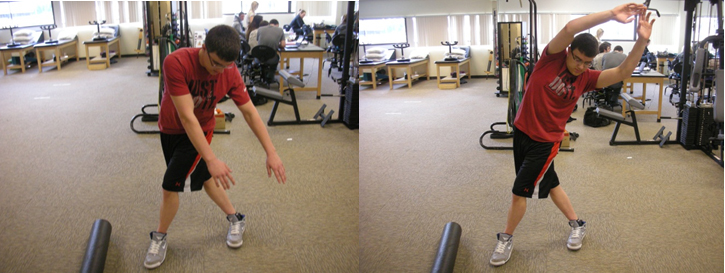
In a standing position cross the affected leg
behind the other. Drive hip
laterally out to the side utilize reach across and reach overhead to add
additional tension to the stretch. (Research has shown overhead reach to
add most increase in length to length with stretching)
Partner Y stretch
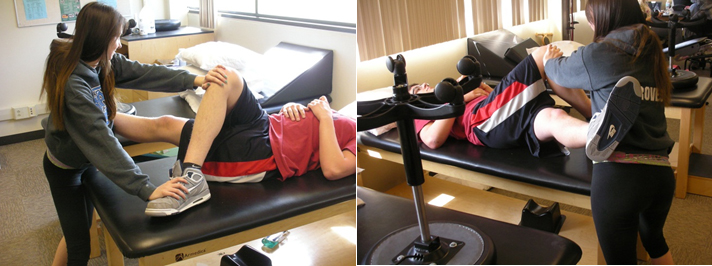
Have your patient lie supine bend knee and place
foot of non-affected side across the affected side.
Place affected leg on your hip and block knee movement with hands
at other sides. You will
shift your weight to the opposite side manually stretching the ITB of
the patient.
Mobilization/ Stretching Summary – Hold all
positions and movements 1-3 minutes spending up to 5-8 minutes on
problematic areas. Note – there really is no right or wrong here you
will develop a feel for when you have cleared the area.
You may not be able to get all of the problems resolved in your
first attempt. Spending
10-30 minutes a day either before or after your activity will get you on
the road to preventing or fighting ITBS.
For ITBS I do like a mobilizing and stretching tissues prior to
running. I want as much
length in the complex as possible prior to running.
Strengthening
3 point Lunge
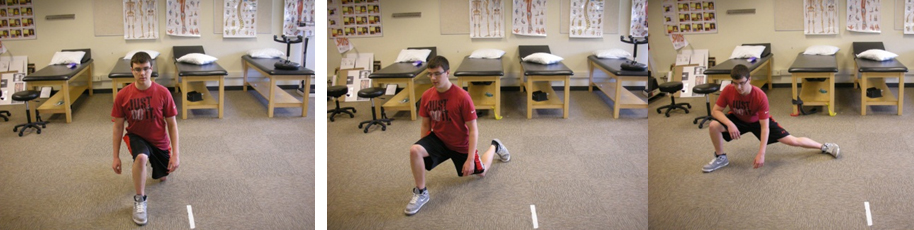
Multidirectional Lunge – step forward bending back
knee to 90 degrees. Step
straight forward, Step on a 45 degree angle, step to the side, repeat
6-10 times each leg in each direction for multiple (sets 2-4)
Straight leg raise

Lie supine with one knee bent and foot flat on
floor. Lock knee into
terminal knee extension and lift leg to the level of the bent knee.
Repeat this with hip external rotation (rotate foot toward the
outside) this will target the VMO and hip adductors 3-4 sets of 10-12
reps
Hip abduction
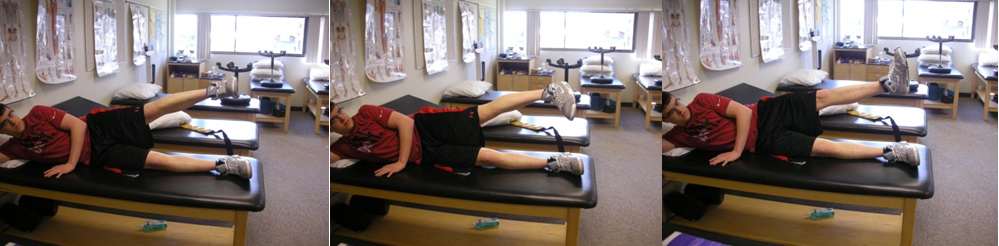
Side lying with effected leg up perform straight
leg lift, add internal and external hip rotation (pointing toes toward
the ground or ceiling for progression.
Perform 3-4 sets of 10-12 reps
Hip Hikes
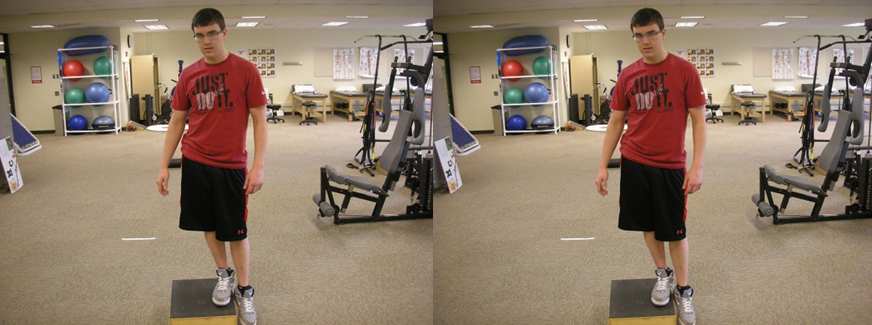
On a step or box start with pelvis in neutral
position controlling drop of leg until foot comes close to touching
ground with straight leg.
Actively fire hip abductors moving past neutral hiking hip up perform 4
sets of 12-15 reps
Cross Over Step up
Stand parallel to stairs or step up box.
Cross outside leg up onto step pushing through flat foot control
hip motion moving to a hike position.
Control slow eccentric movement ad you return crossing back in
front of leg. 3-4 sets of 8-12 reps
Weight shift step ups
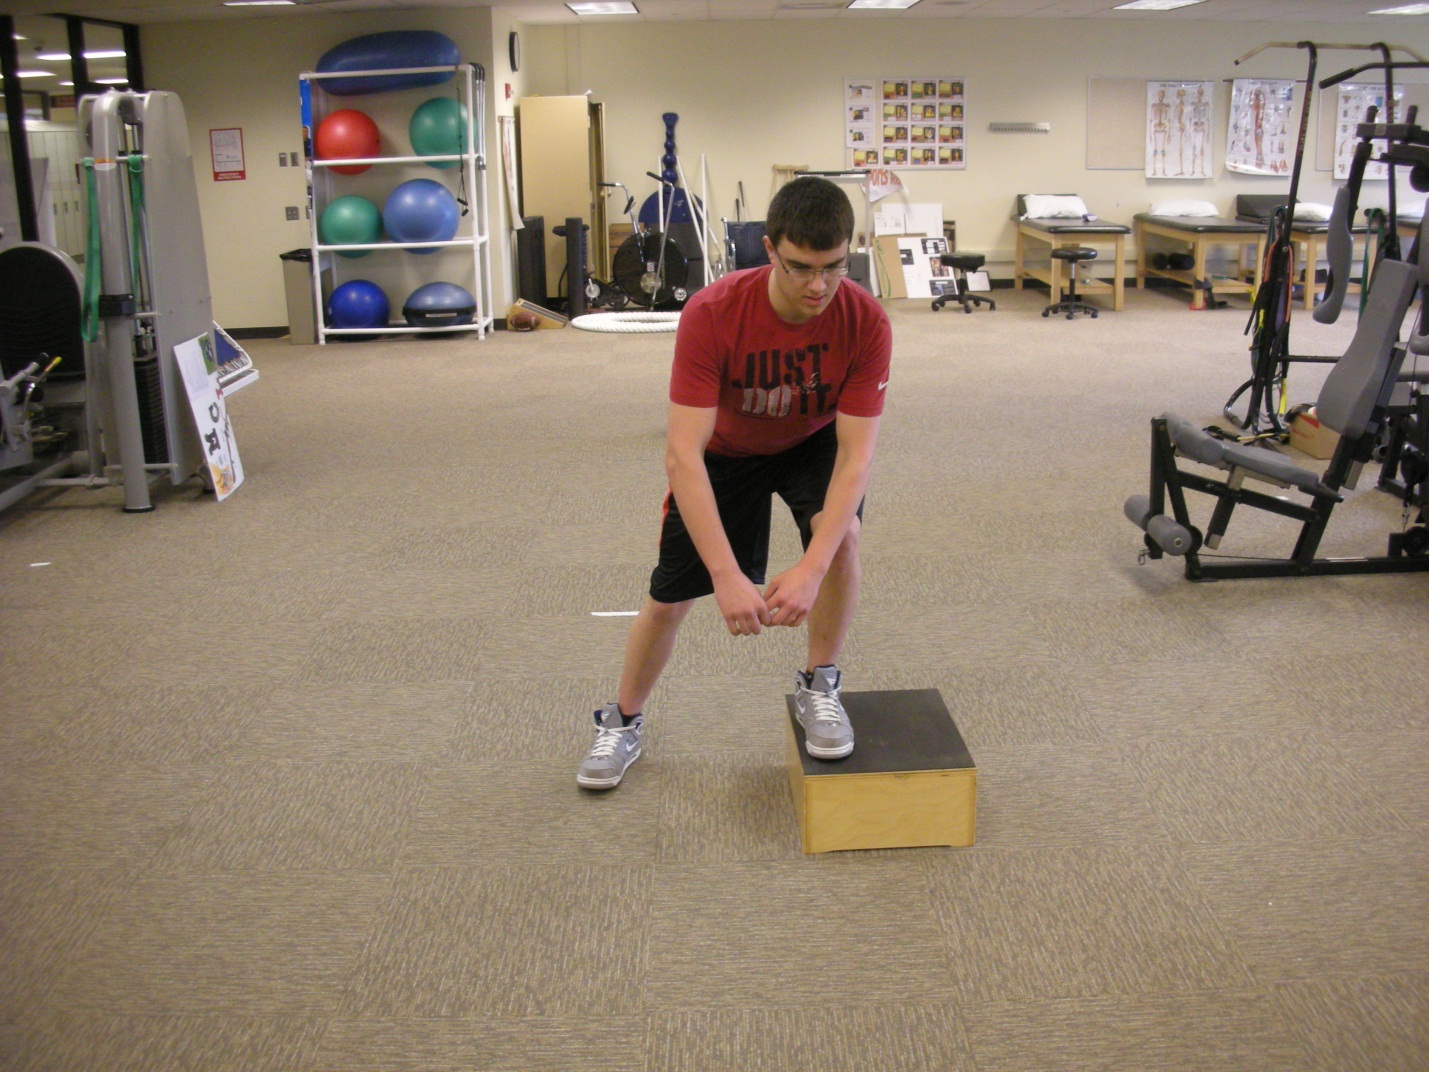
Place foot flat on step or step up box.
Shift weight loading hip and glute on the side you are stepping
with. Driving through heel
step up and repeat. 3-4 reps of 10-12 each side.
Lateral Band Walks
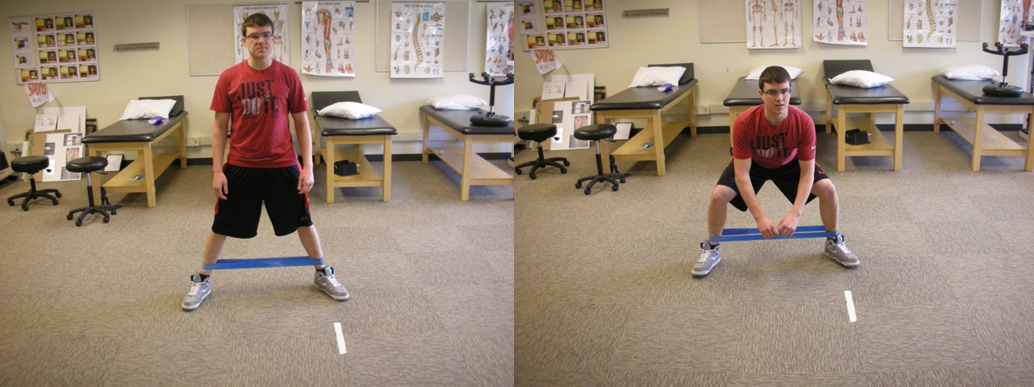
Place band at Knees or ankles.
Shuffle without clicking heels in a controlled manner 10-20 steps
in each direction. Repeat 3-4 times with legs straight and knees bent
Quaraped Hip circles
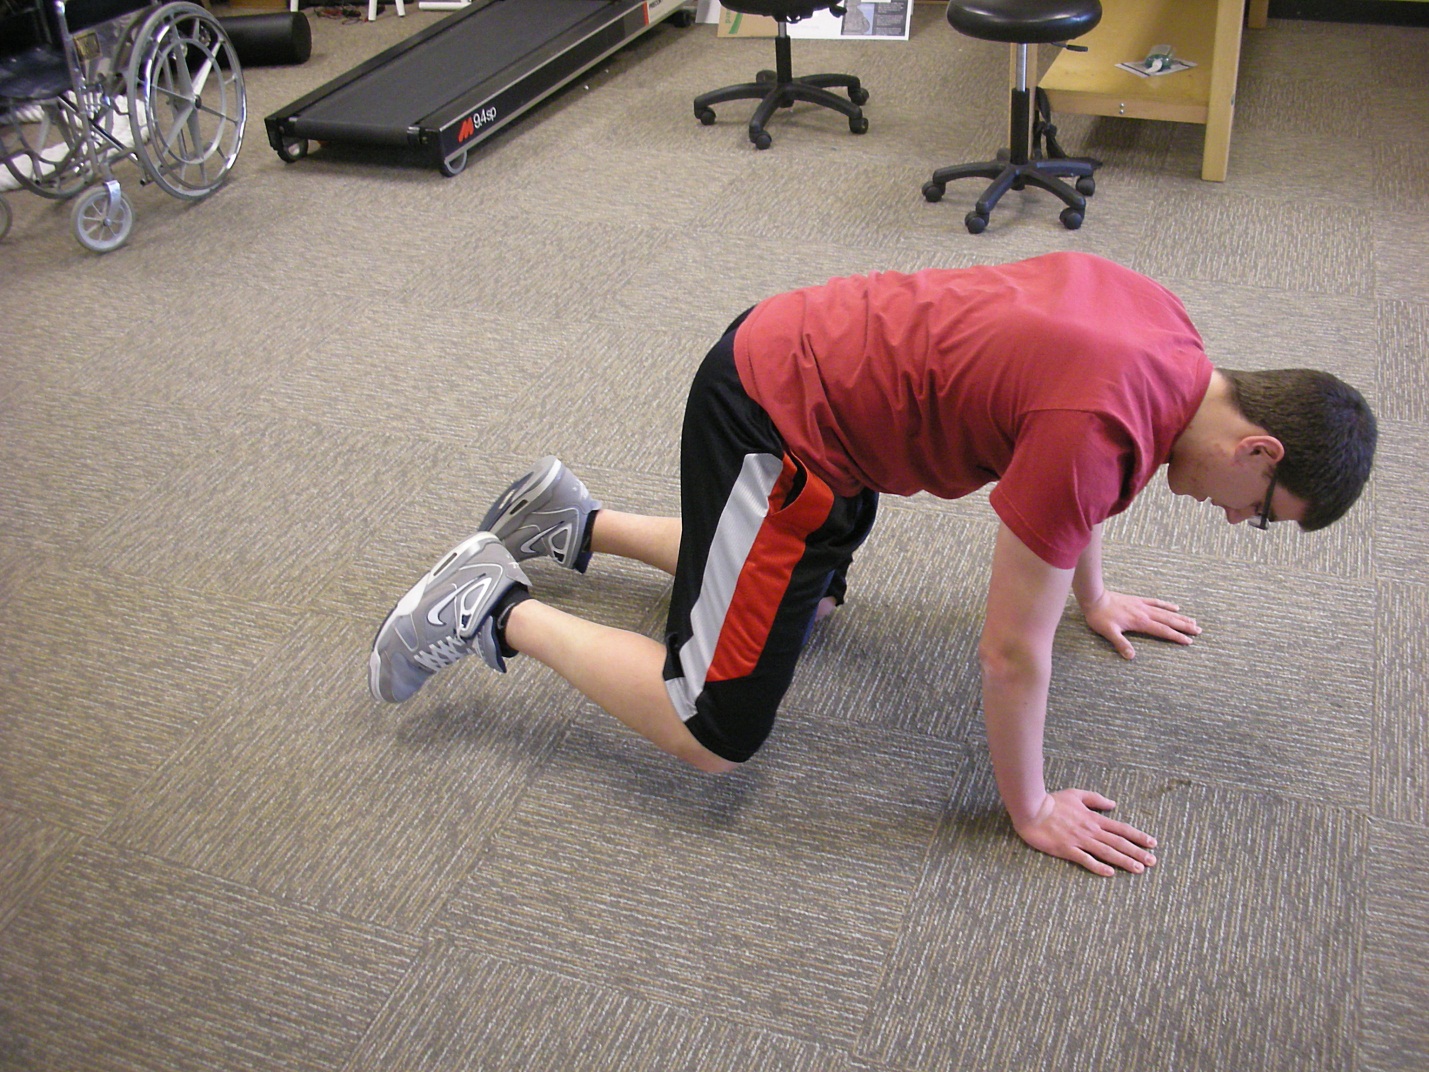
On all fours lift knee off of ground perform small
and large circles with knee.
20 small circles clockwise 20 counterclockwise 20 large clockwise 20
large counter clockwise
Clamshells
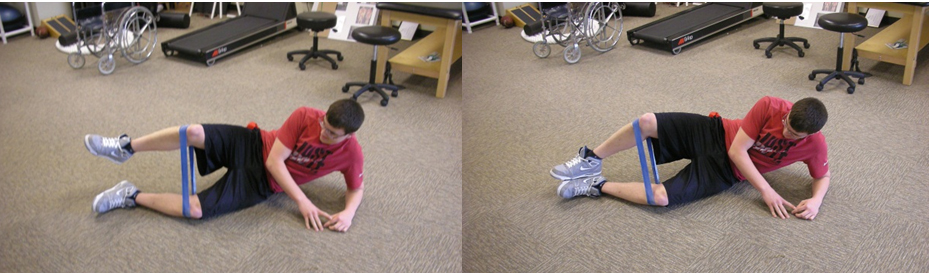
Side lying with surgical tubing around knee place
heels together and abduct hip opening knees apart 3-4 sets of 10-15 each
side
Wall twists

Standing in line with wall approximately 6-10
inches away rotate trunk away from wall while rotating hips toward wall
until tapping wall with hip in a controlled manner.
3-4 sets of 15-20 touches
When am I ready to return to running?
This is a tough one and one that I cannot answer
precisely and even struggled with management of answering this in my own
recovery. This is very
subjective and may lead to a few setbacks or disappointments along the
way. Research has shown that
the area of friction/compression is reduced during faster running so
actually starting back with something faster paced in an interval manner
may be of better choice in return to play decisions.
Some articles contribute downhill
running to ITBS albeit scant anecdotal information we might as well keep
the course flat and why not softer surface, track or firm grass early
on. There is no measurement or guide as to return to play protocol but
there are some things to look for.
We want to make sure that the ITB is flat meaning that any acute
swelling or inflammation to the problem area has resolved.
Pain with ascending and descending stairs should be resolved
prior to any progression into a running program.
Any clicking or popping should be non-existent.
I would like to see patient’s symptom free for 7-10 days at
minimum. Aggressive mobility
and strengthening can alleviate symptoms very fast but an aggressive
return to running may lead to a restart in the recovery process.
Triathletes must also be cognizant of non-running aggravating
activities such as pushing off the wall swimming and cycling.
Note some can tolerate these activities very well but others this
flares their symptoms. As
you can see there are so many tissues that may be involved that the
determination of the recovery timeline can only vary from individual to
individual. Working with a
local Athletic Trainer or Physical Therapist should help guide your
recovery and return to play decision making plan.
They will also have access to specialized equipment such as Alter
G and aquatic treadmills which may be beneficial in a return to running
protocol. Work hard listen
to your body and BEAT THE BAND.
Best in Health,